


VT100 Terminal Emulator on Raspberry Pi Pico
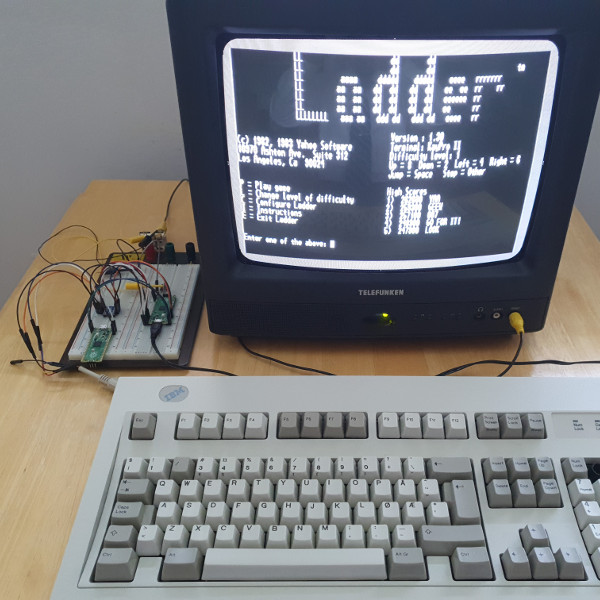
Here is another Raspberry Pi Pico project, this time a DEC VT100 Terminal emulator. Host communication goes through the "standard" UART, composite video is used for the output and a PS/2 keyboard is used for the input. I have named this program "Terminominal".
Since I'm Norwegian I have made some design choices that reflect this. The first is that the composite video uses the PAL standard at 50 Hz. The keyboard scancode handling expects the Norwegian layout, but this can be changed to US layout with a compile time define. Finally the built-in font/character set is ISO-8859-1 (latin-1) compatible.
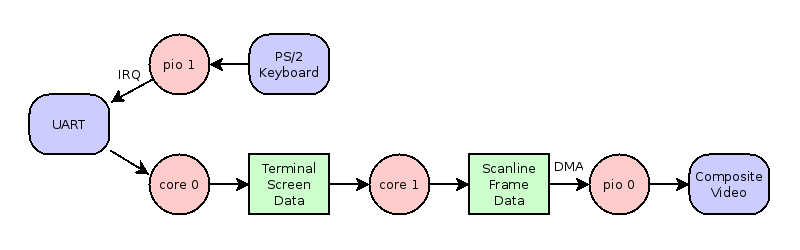
The composite video (CVBS) is generated by one of the Pico's PIO cores running at 40 MHz, which in turn creates time slices of 0.05 microseconds that affects a lot of the architecture in this program. After taking care of overscan, there is 880 dots on 240 scanlines remaining for the "visible" picture. First I tried using a standard CGA font at 8x8 which would give 110 columns by 30 rows, but the picture was almost unreadable. Instead I designed my own 11x10 font which fits perfectly for a 80 column by 24 rows picture and is quite readable on a CRT display.
The first ARM core reads the UART for incoming bytes and processes these to emulate the VT100 behaviour. Escape codes are processed and then a "screen" array is updated which represents all the characters currently on the screen. The second ARM core fetches characters from this "screen" array, if they have changed, and converts these to scanline and dot information using the font data and puts this into a "frame" array. DMA is used by the PIO core to fetch the "frame" array and push this out on the GPIO pins.
A 2-bit DAC for the video is created by using two resistors. Since the GPIO voltage is 3.3V and the composite video input impedance (on a TV set) is 75 ohms, good values are 680 ohms and 220 ohms for these resistors. It is also possible to use 1000 ohms and 330 ohms, which gives a slightly dimmer picture. The 2 bits gives four signal levels, where one is sync and the other three shades of: black, grey and white.
The PS/2 keyboard protocol is handled by the second PIO core which generates an interrupt once the required 11 bit frame has been read. The interrupt handler converts the scancode to the appropriate byte and sends it out on the UART. Note that since the PS/2 protocol uses 5V and the Raspberry Pi Pico GPIO pins uses 3.3V a level shifter is needed in between!
The VT100 emulation has been tested with vttest and the most important features are supported. VT52 and VT102 modes are not really supported. It should work fine against a Linux host at least. The UART runs at 115200 baud, but can be changed through re-compilation to other speeds.
Here is a block diagram which shows the architecture:
Here is a connection/function table for the GPIO pins:
|--------|-----------|------------|-------------------------|
| Pin No | Pin Name  | Function   | Connected To            |
|--------|-----------|------------|-------------------------|
| 1      | GP0       | UART TX    |                         |
| 2      | GP1       | UART RX    |                         |
| 6      | GP4       | PS/2 Data  | 3.3V<->5V Level Shifter |
| 7      | GP5       | PS/2 Clock | 3.3V<->5V Level Shifter |
| 21     | GP16      | CVBS DAC   | 680 Ohm Resistor        |
| 22     | GP17      | CVBS DAC   | 220 Ohm Resistor        |
| 36     | 3V3 (OUT) | +3.3V      | 3.3V<->5V Level Shifter |
| 40     | VBUS      | +5V        | 3.3V<->5V Level Shifter |
|--------|-----------|------------|-------------------------|
Here is a breadboard layout created with Fritzing:
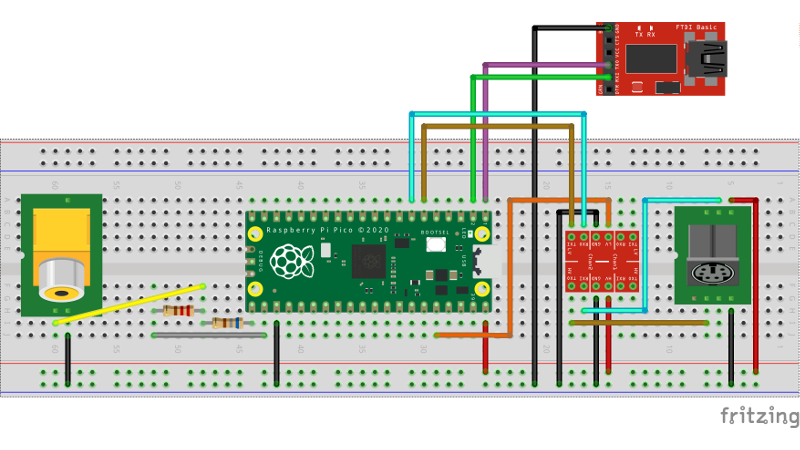
Notice that the GPIO pins for the composite video is on the other end of the Pico. This was needed because it generates a lot of noise, so much in fact that it affects the PS/2 signalling. This would result in lost bits and parity errors.
A snapshot of version 0.1 can be downloaded here, or check the Git repository here. Check the included README.md for build instructions. It is also possible to compile an SDL version which is used for testing directly on Linux.
I appreciate the good instructions from Van Hunter Adams on how to use DMA on the Raspberry Pi Pico and Javier Valcarce on how to generate PAL video signals.
Here is a photo of Terminominal running on one Pico and connected to another Pico running the kaytil CP/M emulator: