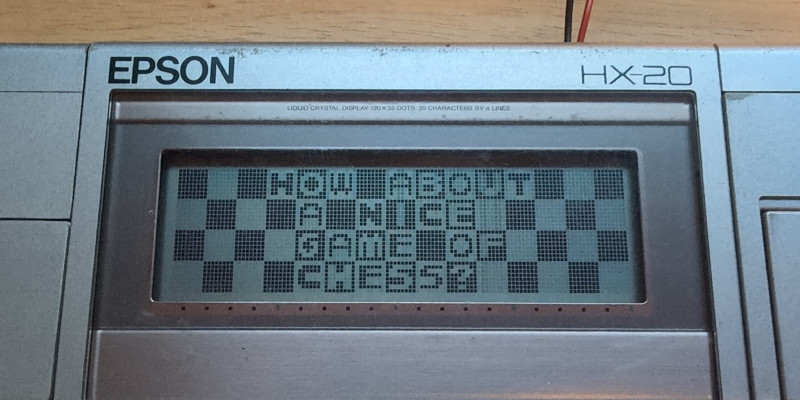




Epson HX-20 Image View
Here is a set of programs to easily display an image on the LCD screen of the Epson HX-20. The image needs to be 120x32, the resolution of the HX-20 LCD screen, and monochrome. It should be converted to the PBM format so it can be easily converted to pixel data which is embedded into the resulting HX-20 binary program.
Here is the assembly program part, to be assembled with dasm:
        processor hd6303

; Hardware registers:
LCDSEL  equ $26
LCDDAT  equ $2A
GATEB   equ $28

; Kernel routines:
DSPLCN  equ $FF49
KEYIN   equ $FF9A
MENU    equ $FF25

        org $1000 ; Run from HX-20 RAM.
; Program:
start:
        ; Initialize variables:
        ldab #0
        stab lcd_col
        stab lcd_row
        stab px_byte
        stab px_byte+1
        ldab #%00001000
        stab lcd_no
        ldab #$ff
        stab px_bit

        ; Clear the whole LCD screen:
        ldab #0
        jsr DSPLCN

next_lcd:
        ; Check if reached the last LCD:
        ldaa lcd_no
        cmpa #%00001110
        bne continue
        jmp end

continue:
        inc lcd_no
        ldaa #$80
        staa lcd_col

next_col:
        ldaa #$40
        staa lcd_row

next_row:
        jsr px_inc
        ldd px_byte
        addd #pixels
        xgdx
        ldaa 0,x
        ldab px_bit

px_shift:
        beq px_shift_done
        asra
        decb
        jmp px_shift
px_shift_done:
        anda #1
        beq px_skip_draw ; Change to 'bne' to invert image.

        ; Draw one pixel:
        ldaa lcd_no
        staa LCDSEL
        ldaa lcd_col
        staa LCDDAT
        sei
lcd_busy_1:
        tst GATEB
        bpl lcd_busy_1
        ldx LCDDAT ; Clock LCD SCK signal.
        ldx LCDDAT
        ldx LCDDAT
        ldx LCDDAT
        cli
        ldaa lcd_row
        staa LCDDAT
        sei
lcd_busy_2:
        tst GATEB
        bpl lcd_busy_2
        ldx LCDDAT ; Clock LCD SCK signal.
        ldx LCDDAT
        ldx LCDDAT
        ldx LCDDAT
        cli

px_skip_draw:
        ldaa lcd_row
        adda #4
        staa lcd_row
        suba #$60 ; Subtract to compare.
        bne next_row
        ldaa lcd_col
        inca
        staa lcd_col
        cmpa #$E8
        beq next_lcd
        cmpa #$A8
        bne next_col
        adda #$18 ; Will be 0xA8 here.
        staa lcd_col ; Store as 0xC0.
        jmp next_col

end:
        ; Wait for keypress and go back to main menu.
        jsr KEYIN
        jmp MENU

; Pixel increment subroutine:
px_inc: ldaa px_bit
        inca
        staa px_bit
        cmpa #8
        bne px_rts
        ldd px_byte
        addd #1
        std px_byte
        ldaa #0
        staa px_bit
px_rts: rts

; Variables:
lcd_no:  dc.b
lcd_col: dc.b
lcd_row: dc.b
px_byte: dc.w
px_bit:  dc.b

; Imported pixel data:
pixels:
        incbin "img.bin"
Here is the C program to convert PBM images to binary pixel data:
#include <errno.h>
#include <stdbool.h>
#include <stdint.h>
#include <stdio.h>
#include <stdlib.h>
#include <string.h>

static bool image[32][120];

static int pbm_read(const char *path)
{
  FILE *fh;
  char line[128];
  int c;
  int x;
  int y;

  fh = fopen(path, "rb");
  if (fh == NULL) {
    fprintf(stderr, "fopen() failed with errno: %d\n", errno);
    return -1;
  }

  fgets(line, sizeof(line), fh); /* Header */
  if (line[0] != 'P' && line[1] != '4') {
    fprintf(stderr, "Not a binary PBM image!\n");
    fclose(fh);
    return -1;
  }

reread:
  fgets(line, sizeof(line), fh); /* Additional Headers */
  if (line[0] == '#') {
    goto reread;
  }

  if (strncmp(line, "120 32", 6) != 0) {
    fprintf(stderr, "Dimensions must be 120x32!\n");
    fclose(fh);
    return -1;
  }

  x = 0;
  y = 0;
  while ((c = fgetc(fh)) != EOF) {
    image[y][x]   = (c >> 7) & 1;
    image[y][x+1] = (c >> 6) & 1;
    image[y][x+2] = (c >> 5) & 1;
    image[y][x+3] = (c >> 4) & 1;
    image[y][x+4] = (c >> 3) & 1;
    image[y][x+5] = (c >> 2) & 1;
    image[y][x+6] = (c >> 1) & 1;
    image[y][x+7] =  c       & 1;
    x += 8;
    if (x == 120) {
      x = 0;
      y++;
      if (y == 32) {
        break;
      }
    }
  }

  fclose(fh);
  return 0;
}

static int pixels_write(const char *path)
{
  FILE *fh;
  int c;
  int x;
  int y;
  int base_x;
  int base_y;
  int lcd_no;

  fh = fopen(path, "wb");
  if (fh == NULL) {
    fprintf(stderr, "fopen() failed with errno: %d\n", errno);
    return -1;
  }

  for (lcd_no = 0; lcd_no < 6; lcd_no++) {
    base_y = lcd_no / 3 * 16;
    base_x = (lcd_no * 40) % 120;
    for (y = 0; y < 16; y += 8) {
      for (x = 0; x < 40; x++) {
        c  = (image[base_y+y]  [base_x+x]       );
        c |= (image[base_y+y+1][base_x+x] << 1);
        c |= (image[base_y+y+2][base_x+x] << 2);
        c |= (image[base_y+y+3][base_x+x] << 3);
        c |= (image[base_y+y+4][base_x+x] << 4);
        c |= (image[base_y+y+5][base_x+x] << 5);
        c |= (image[base_y+y+6][base_x+x] << 6);
        c |= (image[base_y+y+7][base_x+x] << 7);
        fputc(c, fh);
      }
    }
  }

  fclose(fh);
  return 0;
}

int main(int argc, char *argv[])
{
  if (argc != 3) {
    fprintf(stderr, "Usage: %s <in> <out>\n", argv[0]);
    return EXIT_FAILURE;
  }

  if (pbm_read(argv[1]) != 0) {
    return EXIT_FAILURE;
  }

  if (pixels_write(argv[2]) != 0) {
    return EXIT_FAILURE;
  }

  return EXIT_SUCCESS;
}
And here is a Makefile to tie it all together:
all: hx20img.srec hx20img.wav

hx20img.srec: hx20img.bin
	srec_cat hx20img.bin -binary -offset 0x1000 -o hx20img.srec -motorola

hx20img.wav: hx20img.bin
	bin2hxwav hx20img.bin hx20img.wav 1000 hx20img

hx20img.bin: hx20img.asm img.bin
	dasm hx20img.asm -ohx20img.bin -f3 -lhx20img.lst

img.pbm: img.png
	convert img.png img.pbm

pbm2bin: pbm2bin.c
	gcc -o pbm2bin pbm2bin.c -Wall -Wextra

img.bin: pbm2bin img.pbm
	./pbm2bin img.pbm img.bin

.PHONY: clean
clean:
	rm -f pbm2bin img.pbm *.wav *.srec *.bin *.lst
Running make will produce both an S-record and a WAV file as long as the proper tools are installed and an "img.png" image file is present. Check here for the special "bin2hxwav" program. The S-record can be loaded into the hex20 emulator.
The WAV file can be played to a real Epson HX-20 using the external cassette interface. Enter the MONITOR and type these commands:
A
1000
FFFF
/
R C,*.*
Play the WAV file, and when it's done, type:
G1000
Sample image:

Displayed on a real HX-20: