


Turning Frog VL6180 Upgrade
Many years ago I got a soldering kit, the "ELENCO 21-882" which is a "frog robot" with two motors that reacts to sound. I had been thinking about ways to upgrade it, and I finally got around to doing that by controlling it with a Arduino Pro Mini and a VL6180 sensor to measure distance.
The original sound based control works by clocking a "4017 Decade Counter" IC with the input from a electret microphone. The easiest way to hijack the control is to remove this IC from the socket and wire the Arduino into it.
I used the following connections:
Arduino RAW <-> Socket pin 16 (VDD, 9V supply from battery.)
Arduino GND <-> Socket pin 8 (VSS)
Arduino D10 <-> Socket pin 1 (Output, diode for left motor.)
Arduino D11 <-> Socket pin 7 (Output, diode for right motor.)
Arduino D12 <-> Socket pin 2 (Output, diodes for both motors.)
Cobbled together it looks like this:
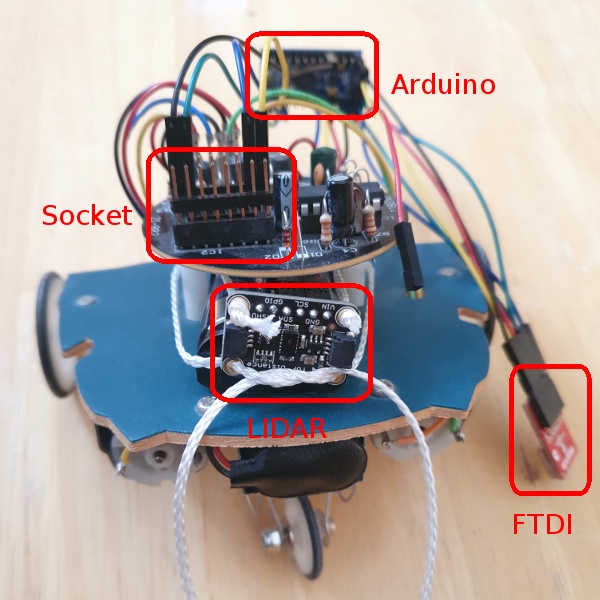
The FTDI is only used for uploading the program and can be removed of course.
The Arduino Sketch code is very simple:
#include "Adafruit_VL6180X.h"

static Adafruit_VL6180X vl = Adafruit_VL6180X();
static int keep_going = 0;

void setup() {
  pinMode(10, OUTPUT); // Left motor
  pinMode(11, OUTPUT); // Right motor
  pinMode(12, OUTPUT); // Both motors
  pinMode(13, OUTPUT); // On-board Arduino LED
  vl.begin();
}

void loop() {
  uint8_t range = vl.readRange();
  uint8_t status = vl.readRangeStatus();

  if ((status == VL6180X_ERROR_NONE) && (range < 200)) {
    // Go left
    digitalWrite(12, LOW);
    digitalWrite(10, HIGH);
    keep_going = 10; // Keep going to finish the turn...
  } else {
    if (keep_going > 0) {
      keep_going--;
    } else {
      // Go forward
      digitalWrite(10, LOW);
      digitalWrite(12, HIGH);
    }
  }

  delay(50);
}